
Almost everyone can relate to the slight panic response from the storage line items on an Azure monthly bill. Cloud storage feels expensive, and even though the compute costs are almost always more expensive than storage costs, especially from Azure Managed Disks, it can become a significant issue one day.
Understanding the underlying dynamics of Azure disk pricing is crucial, whether you're a DevOps engineer deploying new clusters or a FinOps lead trying to mitigate the costs. It's no longer about simply paying for the gigabytes. You also need to consider the performance tiers, input/output operations per second (IOPS), and transactional costs as well.
In this article, I will break down everything that you need to understand about what Azure Managed Disks are and the different types available, each of which has specific use cases; Azure's pricing mechanisms; and the billing particularities most teams overlook, so you can keep from losing money on unnecessary storage.
What Are Azure Managed Disks?
Let’s take a second before we start discussing costs to understand what we are really buying. You can think about Azure Managed Disks as the “easy button” for virtual machine storage. In the past (unmanaged disks), a user would need to create a storage account and handle the disk files (VHDs) themselves. It was previously a headache and very difficult to scale.
Managed disks automatically take care of that backend complexity for you. They offer stronger reliability (99.999% availability), and they connect with availability sets and zones. However, since they are managed services, the pricing schema is different compared to standard blob storage. You are paying for convenience, guaranteed performance, and reserved capacity.
How Azure Managed Disk Pricing Works
A common misconception about Azure Managed Disks is that you pay for incoming data. That is actually not the case. Instead, you get charged for the space you reserve.
Consider the example of having a storage unit. The storage facility will charge you a monthly fee for a unit, regardless of how much content you place inside it. Azure Managed Disks function the same way, which is called provisioned capacity.
Here are the four primary factors that drive your cost:
Disk Type: This is the most significant cost factor, as Premium SSD disks cost much more than Standard HDD disks.
Provisioned Size: You choose a limit from a certain tier, which goes from 128GiB to 1TiB, and you will still get charged for the tier limit even if the disk is not utilized.
Transactions: For standard-tier disks, you pay a small fee for each read and write operation. For Premium and Ultra tier disks, these costs are usually charged as a flat fee, with exceptions for bursting.
Redundancy: If you select ZRS instead of LRS, the cost will usually go up by about 50% because you are further increasing the data replication across different physical locations.
Types of Azure Managed Disks (and When to Use Each)
Microsoft offers a "menu" of disk options. Choosing the wrong one is the fastest way to inflate your bill or crash your application.
Standard HDD
Standard HDDs are the most economical options for storage, but because they use spinning magnetic platters, they are slower than the other options.
Best for: Non-critical backups, dev/test environments, and infrequent access.
Cost profile: Offers the lowest monthly charges, but transaction costs are added. Performance is variable, and there are no guarantees.
Standard SSD
Standard SSDs are solid-state drives, but, unlike the premium SSDs, performance guarantees are lower.
Best for: Web servers, lightly used enterprise apps, and dev/test environments requiring lower latencies compared to the standard HDD.
Cost profile: Moderate monthly fee. Like HDDs, you pay for transactions, but the latency is much more consistent.
Premium SSD
Premium SSDs are the gold standard for production workloads.
Best for: Databases (SQL, MongoDB), enterprise applications, and performance-sensitive workloads.
Cost profile: Higher flat monthly rates, but, unlike the other Premium SSDs, no transaction costs are added. IOPS and throughput are guaranteed, and these are based on the SSD size.
- LRS: $0.01971 per GiB/month
- ZRS: $0.02993 per GiB/month
Premium SSD v2
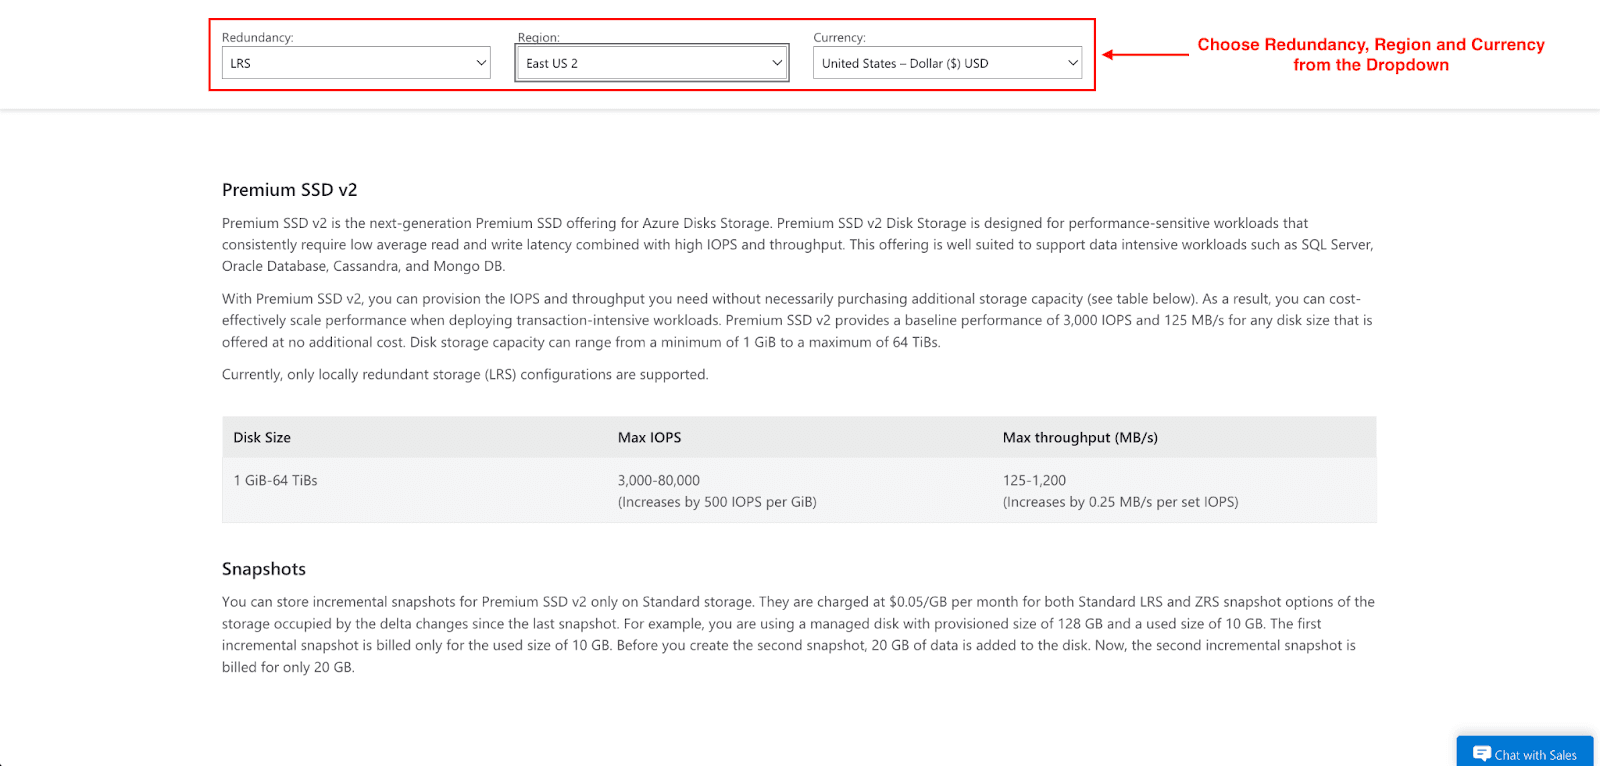
This represents the next generation of the Premium SSD. The largest differentiator is more granular scaling.
Best for: Where there is a need for poor-performing workloads with small volumes of data storage (a high-traffic transactional database of 100GB or less)
Cost profile: Capacity, IOPS, and throughput are billed separately. Meaning, you do not need to provision storage inefficiently just to get higher throughput.
- Disk Size: 1 GiB–64 TiBs
- Max IOPS: 3,000–80,000 (Increases by 500 IOPS per GiB)
- Max Throughput: 25–1,200 MB/s (Increases by 0.25 MB/s per set IOPS)
Ultra Disk
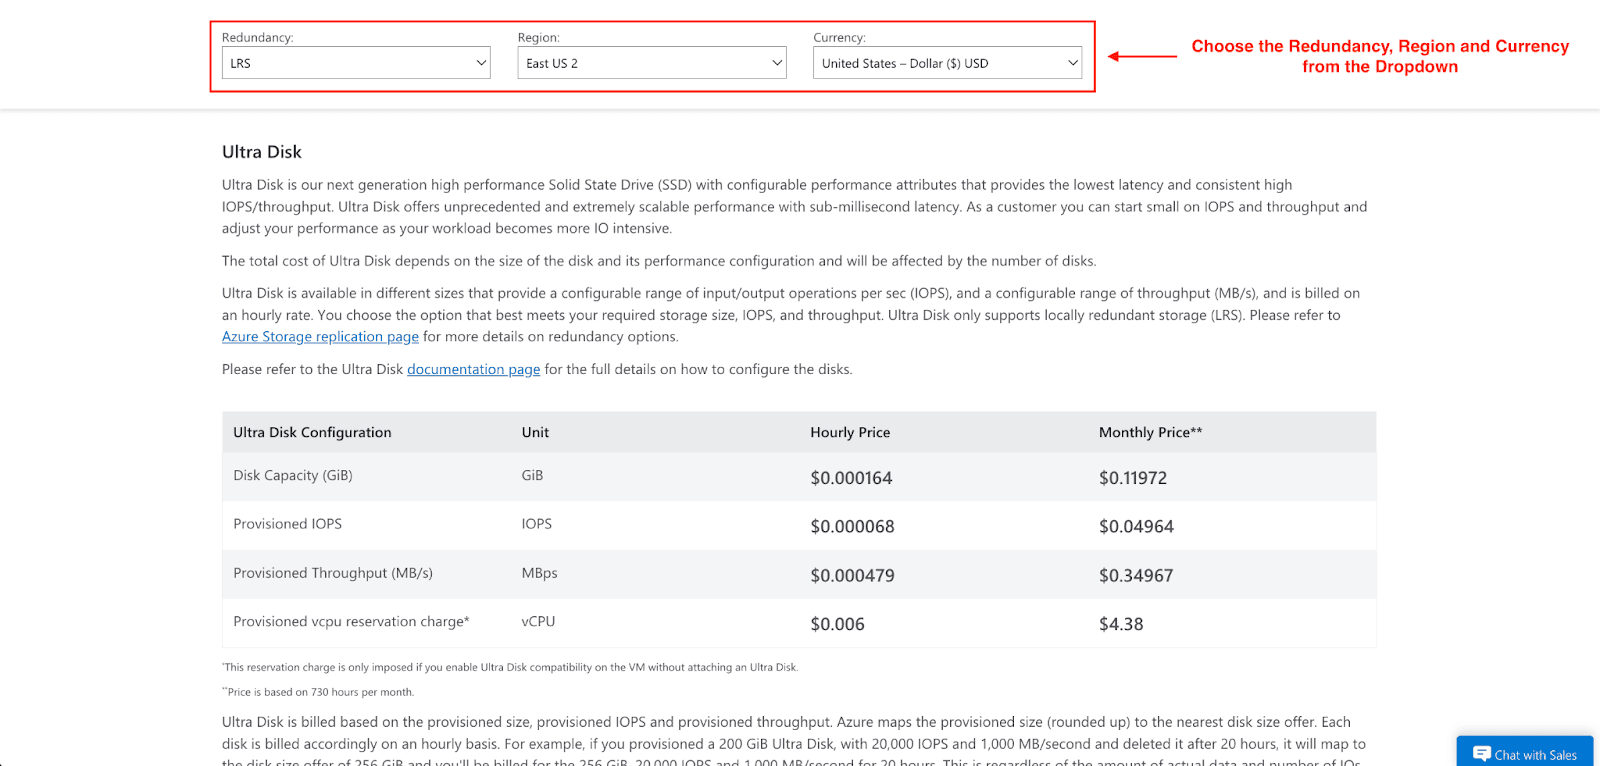
This is the "Ferrari" of Azure storage.
Best for: SAP HANA, top-tier databases, and very large transaction-heavy workloads.
Cost profile: Very high. Charged hourly, with separate costs for provisioned capacity, provisioned IOPS, and provisioned throughput. A vCPU reservation fee will apply for any VM that uses Ultra Disk compatibility, assuming that an Ultra Disk is not attached.
- Disk Capacity: $0.12 per GiB/month
- Provisioned IOPS: $0.05 per IOPS/month
- Provisioned Throughput: $0.35 per MBps/month
Pro tip: Don't guess your costs. Use the official Azure Pricing Calculator by selecting "Storage Accounts" > "Managed Disks."
Hidden Costs You Need to Understand
Here is where the hidden costs lie. If you skim the pricing page, you might miss these critical details that can inflate your invoice by 20-30%.
1. The "Round Up" Rule
Azure disks are tiered by specific size. If you configure a custom disk size of 33 GiB, Azure will not charge you for 33 GiB. They will map you such that you are assigned the next tier up, the P6 (64 GiB). You are, therefore, paying for 64 GiB. Always be aware of the tier boundaries so you do not (even unintentionally) provision 1 GiB over a limit and double your costs.
2. The Zombie Cost (Unattached Disks)
When you delete a VM in Azure, the disk that is attached to that VM does not get deleted automatically by default. This disk will now sit there, unattached, still billing you for the entirety of its provisioned size. We still see environments where 15-20% of the storage bill is for disks that are still attached to VMs that have long been deleted.
3. Snapshot Accumulation
Snapshots are billed on used capacity, not provisioned capacity. However, snapshots are incremental. Let's assume there is a policy that snapshots are taken every day and never delete the snapshots taken. This will mean, over time, that the "cheap" snapshot storage costs will exceed the original disk. This is because the incremental snapshots continue to add to the storage being used.
4. Bursting Fees
With Premium SSDs, bursting or exceeding the limit for short periods is allowed. Usually, credit-based bursting is free, but when On-Demand Bursting is enabled, there is a flat enablement fee and total transaction costs on every burst. This is an added cost that can be unexpected and quite significant in usage for workloads that are being monitored, which go over the limit frequently when left on.
Practical Cost-Saving Strategies
There are no changes you need to make to your application in order to save costs on disks. Here are four things that you can start doing today.
Right-Size Before You Finalize
Do not automatically consider premium SSDs for all use cases. Is that internal administrative tool truly necessary to have 5,000 IOPS? Probably not. For non-production workloads, Standard SSD should be used. There's an easy way to change disk types (though it usually requires you to restart your VM).
Hunt Down Orphans
Run a script or use Azure Policy to identify "Unattached Disks." If a disk is not connected to a virtual machine for 30 days, you should take a snapshot (for safety) and delete the disk. For immediate ROI, this is often the quickest win.
Use Azure Reservations
Buy an Azure Disk Reservation if you are sure you will need a certain capacity for the next year. For Microsoft, there are noticeable (often 5-10% or more) discounts if you commit to one year of storage capacity, and they offer it. This is valid for Reserved Instances for computing.
Leverage Premium SSD v2 for Specific Workloads
Consider switching to Premium SSD v2 if you are purchasing a large 4 TiB disk merely to acquire the IOPS necessary for a database, even though you only contain 500 GiB of data. Rather, you can provision a 500 GiB disk and simply pay extra for the IOPS. In the end, the total should be cheaper than paying for the larger P50 disk tier.
Architecture & Planning Best Practices
Tagging is Vital: What you cannot measure, you cannot optimize. Tag every disk with Environment: Production or Owner: DataTeam. This helps you find out who provisioned expensive storage.
Lifecycle Management: Automate the deletion of old snapshots. A script that deletes snapshots older than 30 days can save thousands of dollars every year.
Match Disk to VM: It makes no sense to attach an Ultra Disk to a basic A-series VM, for example. There are throughput limits on the VM, which will bottleneck the disk. Ensure your VM size can actually handle the speed of the disk you are paying for.
Separate OS from Data: Your OS disk typically doesn’t need to be a P30 (1 TiB). More often than not, a P10 (128 GiB) will be more than sufficient. When working out the cost, treat the OS and data disks as separate line items.
Check Your Region: Prices vary by region. A disk in US EAST 2 could be less expensive than in Brazil South. If latency is not a constraint, storing your data in less expensive regions can result in cost savings.
Conclusion
Regardless of complexity, managing Azure Disk pricing does not have to involve guessing. It comes down to understanding that you are paying for provision capacity and performance, not just simple data storage.
Take a look at your current invoice. Are you paying for zombie disks? Are you using Premium SSDs for development servers that sleep at night? Are you tired of high IOPS when v2 could save you money?
FAQs
Do I pay for disk storage even when the VM is stopped?
Yes. You pay for the provisioned disk capacity, regardless of the state of the VM. Think of it as a reserved parking spot where you pay, irrespective of whether a car is there.
Can I reduce costs with reserved capacity?
Absolutely. Azure does offer Reserved Disk Capacity, which is a much better pricing tier than the on-demand pricing. Think of it as a monthly parking pass instead of paying for parking daily.
Are snapshots free?
No, snapshots are not free. They are billed as a separate item based on the total size of the stored data.
Join Pump for Free
If you are an early-stage startup that wants to save on cloud costs, use this opportunity. If you are a start-up business owner who wants to cut down the cost of using the cloud, then this is your chance. Pump helps you save up to 60% in cloud costs, and the best thing about it is that it is absolutely free!
Pump provides personalized solutions that allow you to effectively manage and optimize your Azure, GCP, and AWS spending. Take complete control over your cloud expenses and ensure that you get the most from what you have invested. Who would pay more when we can save better?
Are you ready to take control of your cloud expenses?


