

When selecting cloud hosting services, you might feel overwhelmed by the options, especially when trying to calculate the potential costs associated with your web application. Azure App Service is designed for easy application hosting, but its pricing system might feel complicated.
In this article, we will explain the pricing model of Azure App Service, summarize the main differences between Windows and Linux pricing plans, and run through a sample case. With this, we hope to provide you with the tools to manage your app service pricing and optimize your costs effectively.
What is Azure App Service?
Azure App Service is a fully managed platform for web apps and App Service Plans. Think of it as a web hosting service without the technicalities, since Azure manages the infrastructure, offering services like servers, operating systems, and network configurations so you can focus on writing code.
It can support complex, multi-tiered applications, all the way down to basic websites. Key features that can influence web app pricing include:
Custom Domains & SSL: Add and secure your domain that is exclusive to you, and is permitted to have SSL certification.
Deployment Slots: Create staging environments to test changes before pushing them to production. This is available in the Azure Standard Plan and higher.
Autoscaling: This allows a running application to automatically adjust its number of operational instances depending on the traffic and active performance measures.
VNet Integration: This enables your app to securely connect to Azure Virtual Network.
Reducing administrative overhead is the reason why many companies have opted for Azure App Services in Ranking Services for the Virtual Machines. No server patching, OS updates, Microsoft simplification web hosting, Azure Services shall, that’s the administrative overhead of web hosting.
How Does Azure App Service Work?
Azure App Service pricing is determined by the App Service Plan. App Service Plans are essentially containers for your web apps. It designates the compute resources (CPU, RAM, storage), as well as the features available for use by the apps running inside. You can run several apps within one plan, and they will all use the same resources.
Think of an App Service Plan like a dedicated server. You get to pick the mojo and size, then host one or multiple websites on it. The plan ultimately becomes the largest driver of your Azure cost.
Autoscaling is a key feature for cost management. It gives your application the ability to automatically adjust resources to a higher or lower amount.
Vertical Scaling: Increasing the resources of your current App Service Plan (e.g., moving from a Basic to a Standard tier).
Horizontal Scaling: Increasing the number of VM instances your app runs on.
Most of the time, compute power, storage for your app files, and bandwidth are the things you pay for, and even data leaving Azure datacenters, as well as monitoring services you enable.
A Deep Dive into Azure App Service Pricing
Prices of the Azure App Service are categorized across several tiers based on different use cases. We explore these tiers below.
Pricing Tiers Overview
Azure has multiple app service tiers available to suit different needs:
Free (F1) / Shared (D1): Perfect for development, testing, and/or low-traffic sites. These tiers are entry-level and run on shared infrastructure with limited computing and memory. The App Service Free tier enables experimentation at zero cost.
Basic (B1–B3): The Azure Basic Plan is more suitable for primary production workloads as it provides dedicated computing resources and is also less advanced in terms of autoscaling and traffic management.
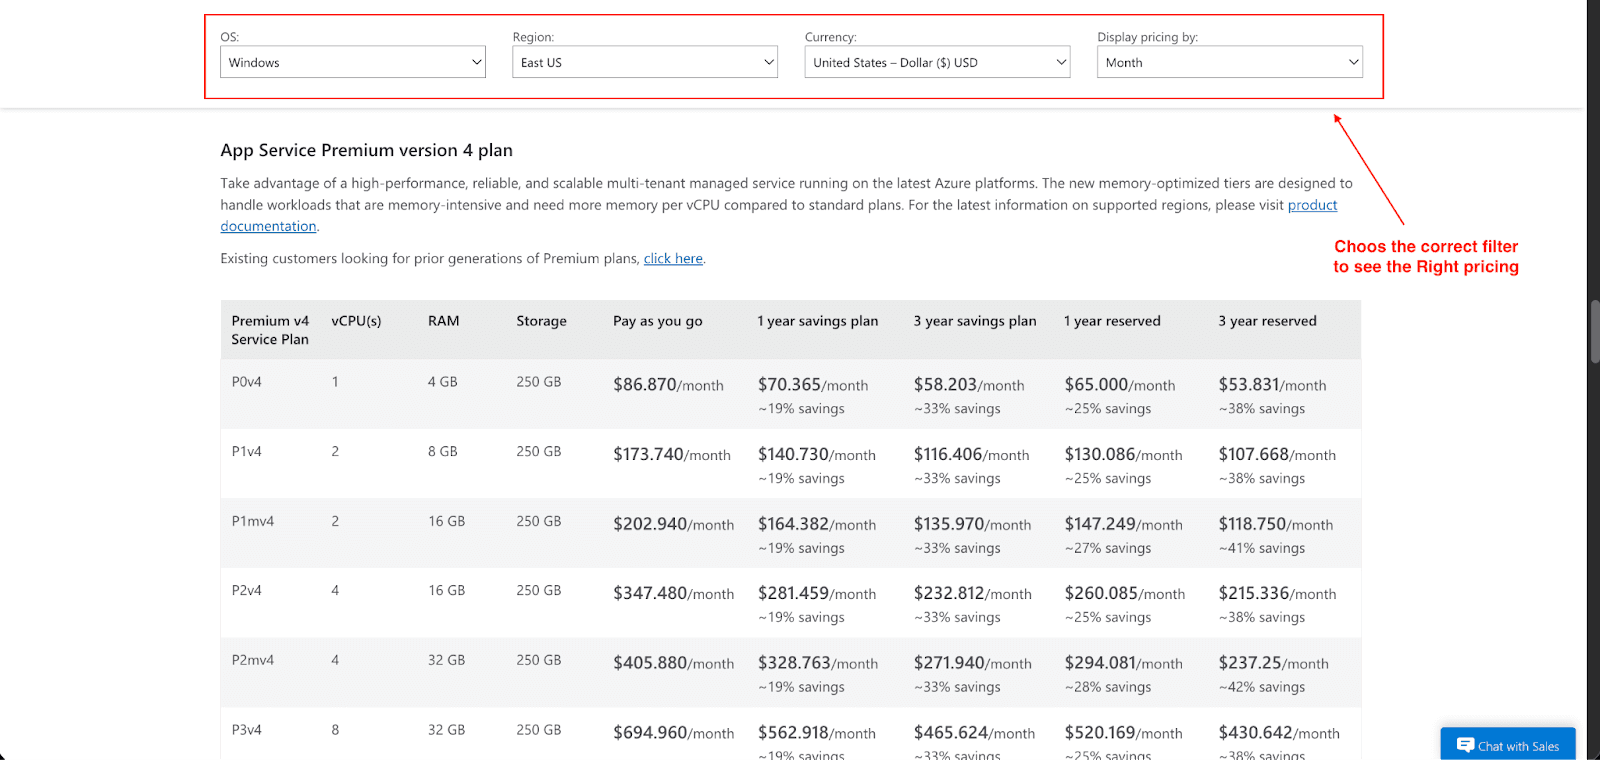
Premium (P1v2/P1v3/P1v4): Large production applications with high traffic are best suited to the Azure Premium Plan, as it delivers enhanced performance in addition to more instances, and other features such as VNet integration.
Isolated / App Service Environment: The mission-critical workloads with the strictest security requirements are best suited to this tier, which also provides the best security and performance of running your apps within an entirely isolated dedicated environment in an Azure Virtual Network.
OS-Based Pricing: Windows vs. Linux
One of the most significant components impacting the costs associated with Azure App Services is the operating system selection:
Windows App Service Plans cost more than the rest. This is mostly due to the additional Windows Server OS licensing costs. This entails selecting a Windows plan when your application is developed using the .NET Framework, along with any other technologies specific to Windows.
Linux App Service Plans are more cost-effective since they use open source software and incur no OS licensing costs. Thus, Linux is more suited to applications developed with Node.js, Python, PHP, or workloads that are containerized using Docker.
What You Actually Pay For
Your monthly cost is calculated by a few variables:
Compute Hours: This is the largest contributing factor to your cost. Compute hours are dependent on your App Service Plan tier (Basic, Premium v2/v3/v4, Isolated), the number of vCPUs and amount of memory, cost differences on Windows vs Linux, and per-instance per-hour pricing.
Storage: Every service plan has a set amount of storage included with it. You own the app content and logs, backups, and additional storage that diagnostic data requires.
Networking & Bandwidth: Outbound data transfer from Azure data centers is charged per GB. Inbound data transfer is free.
Deployment Slots: They incur additional cost at the Premium tiers (v2/v3/v4, Isolated). When they are not being used, they can still incur resource consumption and costs.
Add-ons: Services such as App Service Domains, SSL Certificates, and higher-tier Diagnostics incur additional cost.
Cost Comparison Example
Let’s consider the scenario. A Basic (B1) plan for a small web app might cost:
Windows: $55/month
Linux: $13/month
The savings for Linux are immediately apparent. For a median-sized enterprise application costing on a Premium P1v3 plan, the difference is also considerable.
Windows: $241/month
Linux: $124/month
Your monthly Azure cost is greatly influenced by either upgrades or downgrades between these specific service plans. Choosing the right plan and operating system can make a big difference in your budget.
Case Study: Optimizing App Service Costs
KPMG Australia provides a great example of efficiently using Azure App Service. They developed KymChat, a generative AI assistant, to boost productivity for their 10,000 employees. To make the solution scalable, they containerized the backend code and deployed it on Azure App Service.
KPMG Australia has made great use of Azure App Services. KPMG developed KymChat, a generative AI assistant, to increase the productivity of KPMG's 10,000 employees. To make the solution scalable, they containerized the backend code and deployed it on Azure App Services.
Key takeaways:
Scalability with ease: KymChat is commutable and is able to scale on its own due to Azure App Service's possibilities. Seamless scaling gets completed on the user metrics.
Cost efficiency: The ability to autoscale helps to match resource needs within a system's structure, thus removing excess provisioning.
Flexible deployment: There is great Flexibility in deployment due to the containerization of the backend code.
Tools and Tips for Cutting Azure App Service Costs
Cost management on Azure is not an overly challenging task. With the use of various tools and cost reduction strategies, you can make the desired impact.
Tools for Cost Management
Azure Cost Management + Advisor: Azure provides transparency into your spending and helps manage and provide custom recommendations \ for your spending through this built-in service.
Azure Pricing Calculator: Make sure to estimate your app service costs before committing by modeling different setups and comparing costs across OS, region, and plan type. Be sure to check Windows vs. Linux pricing and forecast worst-case autoscaling scenarios.
Azure Monitor: Use this to see if your app is utilizing too many or too few resources.
Cut Azure App Service Costs with Pump
If you’re looking for an easy way to optimize your Azure App Service costs, Pump is a tool worth checking out. It automates cost management by analyzing your usage to identify areas of overspending, like oversized plans, underutilized instances, or inefficient scaling.
The real benefit, though, is how it handles Reserved Instances. Instead of requiring you to commit to long-term plans yourself, we use AI and group buying power to secure discounted pricing on your behalf without locking you into long-term commitments or requiring manual tracking.
For example, a $100/month App Service Plan can drop to around $65/month with our group discounts, saving you 35% instantly. It’s a low-effort way to make sure you’re not leaving money on the table, especially if you’re running multiple App Services or Premium-tier workloads.
The best part? You can free to use.
Practical Cost-Saving Tips
Right-Size Your Plan: If a Basic or a smaller Premium plan works, don't go for the upper-tier options like Premium v2/v3 right away. This is similar to getting a compact car for daily errands instead of a Ferrari, which is a lot more expensive. Regularly monitoring the app's CPU, memory, and throughput should allow you to gauge if you need to downgrade to a cheaper tier with more tailored resources.
Use Autoscaling Wisely: Set up autoscaling so you add instances when there's high traffic and remove instances when it's quiet. This is a lot more cost-effective than simply running extra instances 24/7.
Choose Linux for Dev/Test: Linux App Service Plans cost 10-30% less than Windows. For containers, .NET 6+, Node.js, Python, PHP, Go, or Java use Linux, and for legacy .NET Framework apps use Windows.
Offload Static Content: Use Azure CDN or Front Door to deliver static assets, like images and CSS. This alleviates your App Services and saves on bandwidth.
Remove Unused Deployment Slots: Every deployment slot requires compute power and storage capacity, along with logging. Deployment slots not in use for staging or blue-green deployment will only serve to add unnecessary costs.
Reserve Compute: For a stable and predictable workload, a Savings Plan or Azure Reservations for your Premium tier instances may make sense to utilize. Committing to a one or three-year term may yield savings of up to 55%.
Conclusion
I hope this guide has given you a clearer understanding of Azure App Service pricing and how to manage it effectively. The right pricing tier and right operating system with the right active management will ensure the smooth running of your applications within a reasonable budget.
Make the effort to understand your current setup. Look for active hidden savings with Azure Cost Management and Pump, then use the techniques discussed here to improve the cost of your app service. Your budget will be happy with the effort.


