
Cloud bills can scale up quickly the moment you turn your back. Reason? Resources that sit idly. Over 40% of cloud computing resources are utilized on average on weekends during non-work hours. Costs are incurred regardless of usage. It's like keeping the lights on at heck knows what hour in an office on automatic when your Amazon EC2 and RDS instances run 24/7.
These increasing cloud computing costs are a strain on the wallet. This is especially true in the case of a startup and a growing company. Manually starting and stopping resources is a tedious, error-prone task that no engineering team wants to manage.
The AWS Instance Scheduler comes in to help you. It's a categorized, powerful self-service solution that AWS provides to automate operational workflows. The solution is aimed at improving the operational workflows to make the process more efficient.
In this article, I will walk you through everything you need to know, from what it is and how it works, including its features.
What is AWS Instance Scheduler?

An AWS solution that includes the AWS Instance Scheduler automates the starting and stopping of Amazon EC2 and Amazon RDS instances. Instead of a smart timer, we can think of it as an intelligent controller for your cloud resources. You create a plan, and the tool makes certain the instances are only running for the period that they are actually needed.
Shutting down development, testing, and other non-production environments during the nights, weekends, and holidays takes you closer to paying for zero idle computer time. The solution is able to accomplish this through AWS Lambda, Amazon CloudWatch, and Amazon DynamoDB, all orchestrated through resource tags.
It supports three key services:
Amazon EC2.
Amazon EC2 Auto Scaling Groups.
Amazon RDS Instances.
Key Features Explained
The flexible and powerful AWS Instance Scheduler has numerous available features:
Tag-Based Control: Easily manage schedules by assigning tags to instances. For example, use the tag key as Schedule and value as uk-office-hours to automate scheduling.
Custom Schedules: Design schedules as needed; for example, after-hours, weekends, maintenance windows, or even for tailored timelines for specific projects.
Multi-Account Support: Multi-account management is possible by deploying the scheduler in a primary account and paired with IAM roles; managing resources in the entire AWS Organization is effortless.
Pause and Resume Workloads: Pay only for what is used by automatically stopping idle compute resources and then restarting them when needed.
Reusable Configurations: Set schedules once in DynamoDB, and the configurations can be reused for multiple instances.
How does AWS Instance Scheduler work?
The AWS Instance Scheduler isn't a single, clickable service in the AWS console. Instead, it’s a solution built on several core AWS services working together.
Here’s the basic architecture:
Amazon CloudWatch: Acts as the trigger. A CloudWatch Events rule fires a Lambda function on a schedule that you set (for example, every five minutes).
AWS Lambda: The Lambda function scans a set of resources that have the “Schedule” tag set and then checks the current time against the desired state.
Amazon DynamoDB: A DynamoDB table stores all your custom schedules (for example, “office-hours”, "weekends-off’) and periods. The Lambda function accesses this table to know what action to perform.
AWS IAM: Provides the necessary permissions. An IAM role allows the Lambda function to describe, start, and stop EC2 and RDS instances.
The logical flow is straightforward:
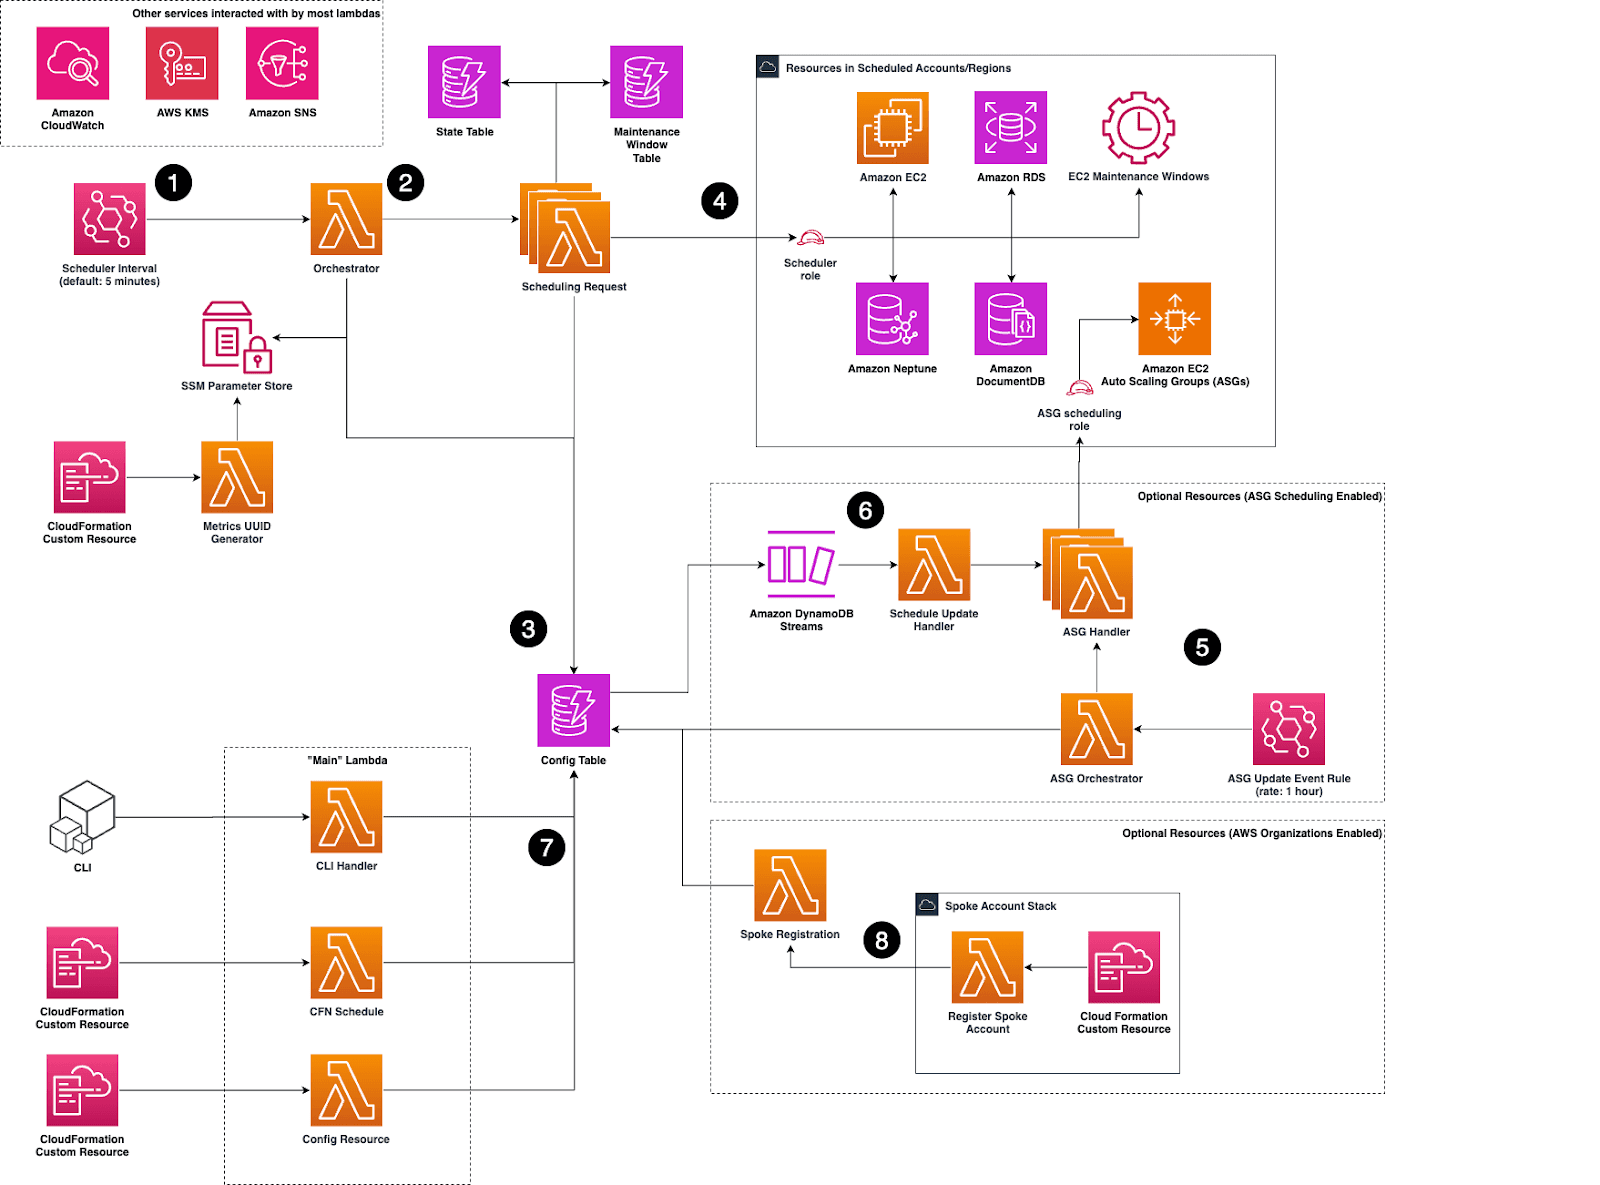
Image Source: AWS
A CloudWatch rule triggers the Lambda function.
The Lambda function queries the DynamoDB config table to retrieve all defined schedules.
It then scans your EC2 and RDS resources for a specific tag (e.g., Schedule).
If a tagged resource's schedule indicates it should be stopped or started, the Lambda function executes that action.
Logs saved in Cloudwatch.
Benefits of Using AWS Instance Scheduler
Integrating an EC2 scheduler or RDS scheduler offers workflow improvements in several key areas:
Lower Cloud Costs: Stopping EC2 or RDS instances during off-peak hours allows companies to save on cloud costs by roughly 30-40%. For resources required during a standard work week, time reduction can be from 168 hours a week to roughly 50 hours with proper scheduling.
Automate Start/Stop Cycles: Remove manual change processes or any bespoke work required, as the engineering team no longer has to do any of the manual work; the whole scheduler processes everything by itself..
Reduce Manual Effort: Forget about the team’s processes to remember late in the night to shut down the server, as AWS automation has all processes almost risk-free, with no human error, with real projects as the team will have scheduling to comply with.
Tag-Based Control: Control of resources is easy to manage from a central point. Scheduling of instances is simple to execute, as some tags can be set to control which low to high hundreds of resources to take through each complex process control.
Common Use Cases
The AWS Instance Scheduler is ideal for any environment that doesn't require 24/7 uptime:
Development & Staging Environments: Automate shutdown of dev servers to save on cost during non-business hours.
QA and Testing Environments: Run testing servers only when active testing is underway.
Training and Sandbox Environments: New employees are provided with sandbox accounts, which are active only for the duration of their training.
Batch Processing Workloads: Launch a fleet of high-capacity instances for a batch job and shut them down automatically after completion.
Startup Environments: Cash-strapped, early-stage companies can save money by limiting the internal tools to only those that are critical during the workday.
Step-by-Step Setup Guide
Deploying the AWS Instance Scheduler takes about 5-10 minutes using a CloudFormation template.
To do this:
Go to your AWS console and open the AWS Instance Scheduler CloudFormation template.
Specify stack details:
- Enter a stack name like My-Instance-Scheduler.
- In the Parameters section, adjust the default value, which defines the default timezone, which services to schedule (EC2, RDS, or Both), and the custom tag (default is Schedule) to your desired value.
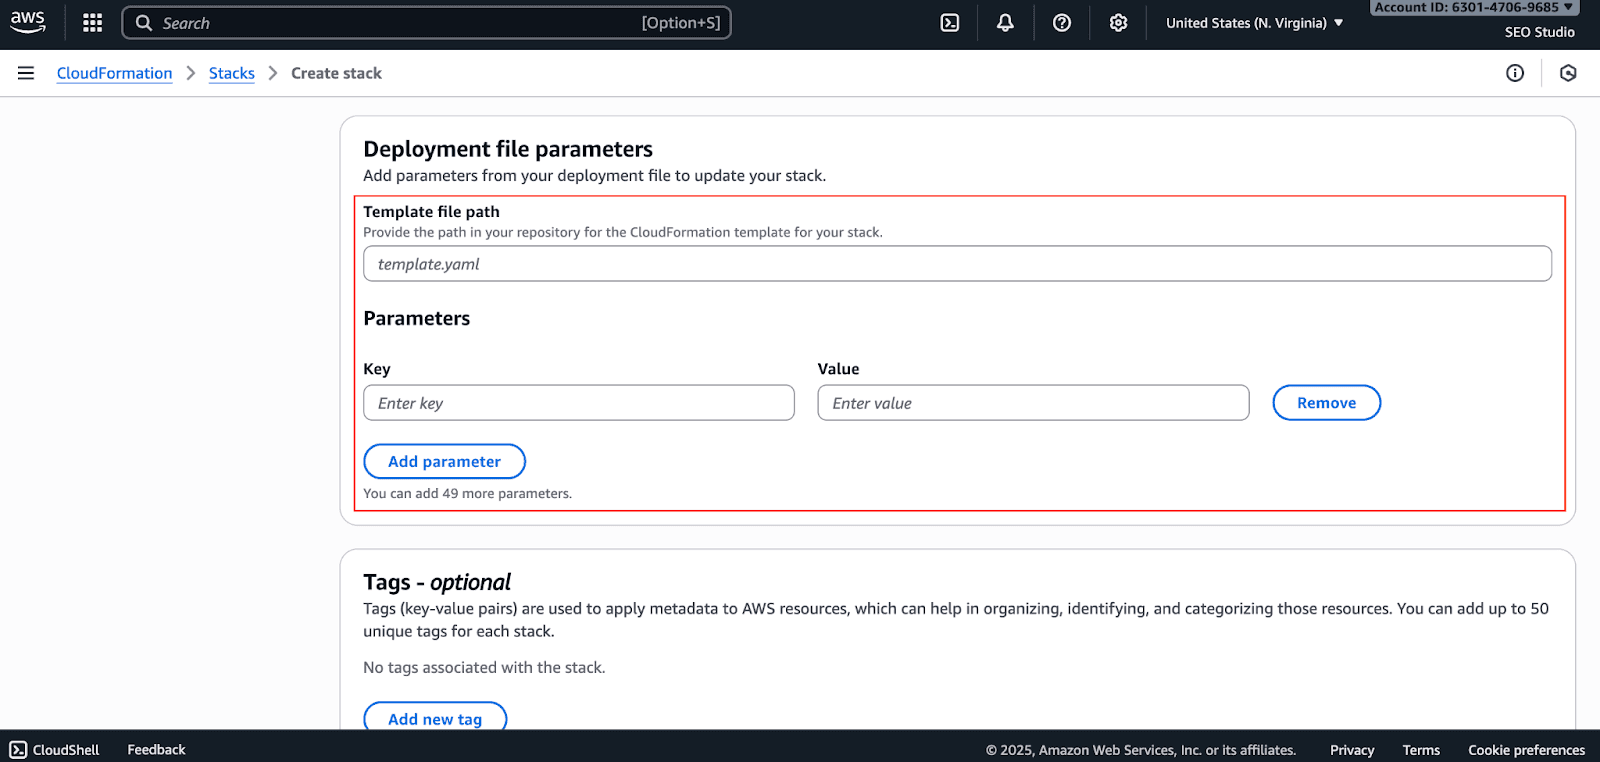
Deploy the Stack: Verify your parameters, check the box that states you acknowledge IAM resources will be created, and click Create stack.
Configure Schedules in DynamoDB: Once the stack is created, go to the DynamoDB console. You’ll find a new table named your-stack-name-ConfigTable-.... This table comes pre-populated with sample schedules and periods. You can edit these or create new ones to match your business needs.
Apply Tags to Your Instances: The final step is to tag your resources. Go to your EC2 or RDS console, select an instance, and add a tag. For example, to apply the pre-configured office-hours schedule, add a tag with:
- Key: Schedule
- Value: office-hours
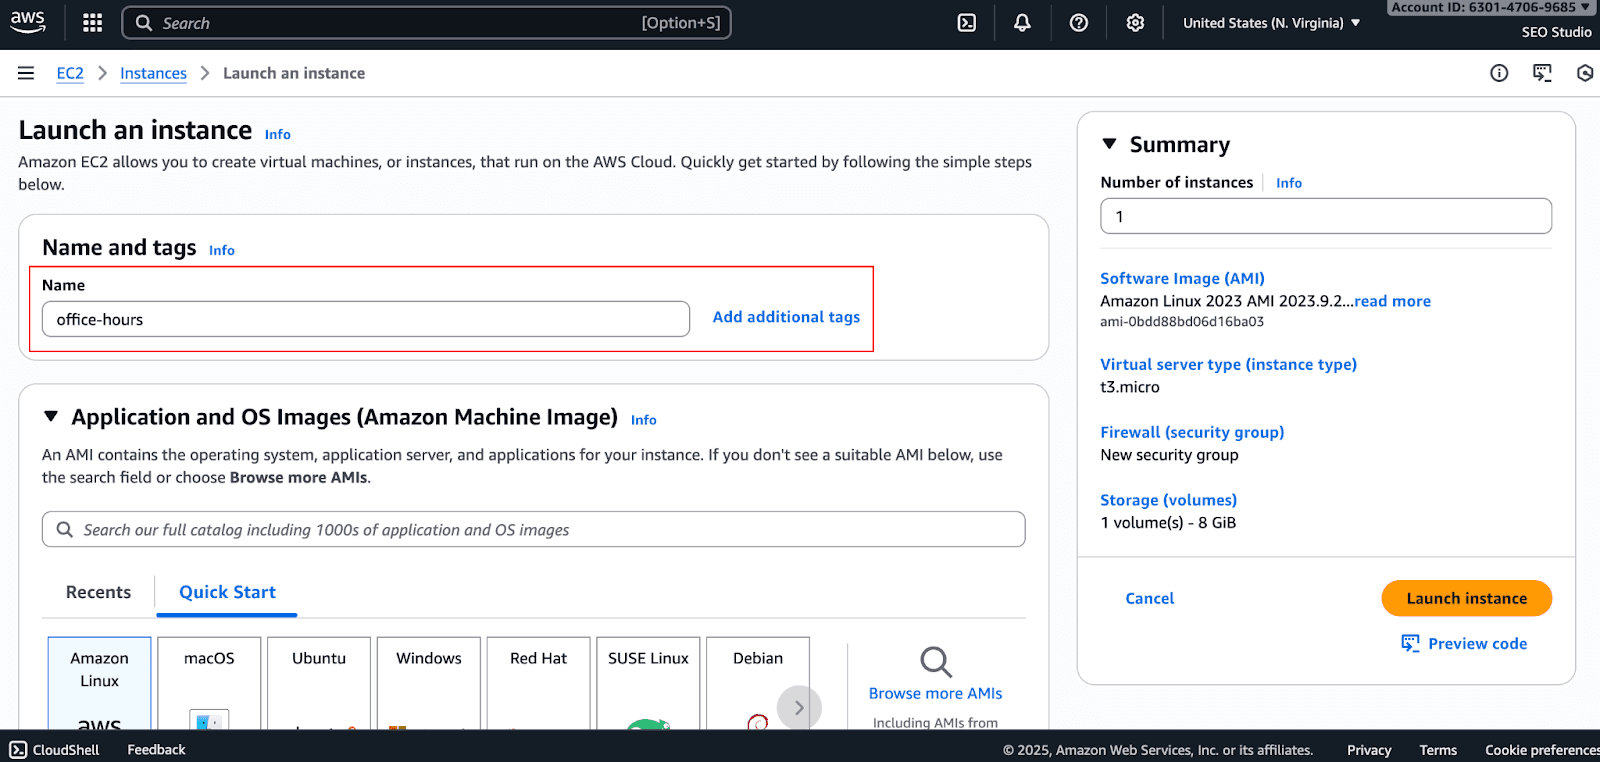
The scheduler will start and stop this instance automatically as per the office hours defined in the connecting DynamoDB table.
AWS Instance Scheduler vs. Alternatives
Having a native Instance Scheduler is great, but not the only option available.
Method | Pros | Cons |
AWS Instance Scheduler | Native AWS solution, free to use (pay only for underlying resources), secure. | Initial setup can be complex, lacks a GUI, and managing many schedules can be difficult. |
Manual Scripts (Lambda) | Highly flexible and customizable to your exact needs. | High maintenance overhead, requires coding skills, prone to errors if not managed carefully. |
Third-Party FinOps Platforms (Pump) | Fully automated, advanced reporting provides recommendations beyond scheduling (e.g., rightsizing), offers a user-friendly UI. | Nil |
Limitations and Common Errors
Be aware of a few limitations:
No Console UI: You can work all the settings through DynamoDB and tags, and this can become quite complicated.
Complex Timezone Needs: When scheduling events, the crossing of multiple time zones can get quite complicated.
Manual Updates: If a schedule changes, you must manually update the DynamoDB table.
Common errors include:
Wrong Tags: Failing to apply a schedule will require you to apply the correct tag key and value.
Permission Errors: Confirm that the Lambda execution role is granted the necessary IAM policy permissions to control and have authority over your EC2 and RDS.
Incorrect Cron Expression: Check the rules under your CloudWatch and the associated cron expression to confirm that the correct frequency is scheduled to run.
Conclusion
The AWS Instance Scheduler is an important piece of software that any organization with the intent of lowering their costs on AWS infrastructure. Full optimization of automated start and stop functions enables a company to make huge savings on a cloud monthly bill with almost no ongoing work. While some crucial technical steps will have to be taken in the beginning, the payoff in the end is surely something to be looked forward to.
As long as the infrastructure tags are not too messy and the scheduling doesn't get too complex, it is a solution that works at very low costs. However, for larger as well as dynamic settings, it would be wiser to use FinOps tools that are optimized to take care of these issues for you.
If the goal is to gain automated savings with zero effort on AWS, Pump can provide you with AWS savings with no contracts or engineering work required, on discounts similar to those that Fortune 500 companies get. Considering this, I hope you learned everything you need to know!


